Before I worked at a gaming café, I was an average gamer. I played on whatever settings the game defaulted to, assumed “Ultra” meant better, and never questioned any of it.
Then I started my job.
I watched serious gamers walk in, sit down, and immediately go into the settings menu before a single match. They changed things I had never even noticed existed. And they played on settings that looked worse — on purpose. That confused me.
So I started asking questions. Then I started testing. After two years of maintaining gaming PCs, PS5 consoles, and racing simulators at the café — and watching hundreds of players tweak their setups — I finally understand what every setting actually does and why it matters.
This guide is for every gamer who has stared at a settings menu and had no idea what they were looking at. In this guide I have every major video game settings explained in plain language, tell you what it looks like in game, and tell you what I actually recommend.
Why Game Settings Matter More Than You Think
Most people think game settings are about making things look pretty. They are not. They are about the relationship between your hardware, your monitor, and how the game feels to play.
The wrong settings can make a game feel laggy even on a powerful PC. The right settings can make a budget PC feel smooth. And some settings that look amazing on screenshots will actively ruin your experience in a real match.
Let me go through every one.
Resolution
This is how many pixels your game is drawing on screen. 1920×1080 is Full HD. 2560×1440 is 2K. 3840×2160 is 4K.
Higher resolution means a sharper, cleaner image — but it is the single biggest demand on your GPU. Doubling your resolution more than doubles the work your graphics card has to do.
What I recommend: Match your monitor’s native resolution. If your PC cannot hit 60fps at your monitor’s native resolution, drop to the next one down rather than sacrificing everything else.
Frame Rate / FPS (Frames Per Second)
This is how many images your GPU is sending to your monitor every second. 30fps feels like a slideshow to competitive players. 60fps is the minimum for comfortable gaming. 144fps is where fast games — shooters, racing games — start feeling genuinely smooth.
Here is the thing nobody explains clearly: FPS is not just about looks. Higher FPS means your inputs (mouse clicks, controller presses) register faster. At 30fps there is up to 33 milliseconds of input delay built in. At 144fps that drops to 7 milliseconds. In a competitive game that difference is real.
What I recommend: Prioritise hitting your monitor’s refresh rate consistently. A stable 60fps always beats an unstable 100fps.
Frame Rate Cap / FPS Cap
This limits your game to a maximum frame rate. Sounds pointless — why would you cap your fps? — but it is actually really useful.
Uncapped frame rates cause your GPU to run at 100% constantly, generating heat and noise even in menus. Capping your fps slightly below your monitor’s refresh rate (e.g. 141fps cap on a 144Hz monitor) reduces that and actually makes your frame times more consistent, which makes the game feel smoother.
What I recommend: Cap your fps at 1–3 below your monitor’s refresh rate if you are not using VSync.
VSync (Vertical Sync)
VSync synchronises your game’s frame rate to your monitor’s refresh rate. It eliminates screen tearing — that horizontal line that appears when your GPU sends a frame mid-refresh.
The downside is input lag. When VSync is on, your GPU waits for the monitor to finish refreshing before sending the next frame. On a 60Hz monitor that can add up to 16ms of delay. In fast games that feels awful.
What I recommend: Turn VSync off if you have a G-Sync or FreeSync monitor — those do the same job without the lag. If you do not have an adaptive sync monitor and screen tearing bothers you, use the in-game frame cap instead of VSync.
G-Sync and FreeSync
These are Nvidia and AMD’s versions of adaptive sync. Instead of locking your frame rate to your monitor like VSync does, they make your monitor dynamically match whatever frame rate your GPU is producing. No tearing, no input lag.
G-Sync is Nvidia only and requires a certified monitor. FreeSync is AMD’s open standard and works on most modern monitors.
What I recommend: If your monitor supports it, turn it on and forget about VSync entirely.
Resolution Scale / Render Scale
This one confused me for a long time. Your game might be running at 1080p on your monitor, but render scale lets you change the resolution the game is actually drawing at internally.
At 100% the game renders at your native resolution. At 75% it renders at a lower resolution and then upscales it to fill your screen — looks slightly softer but runs faster. At 150% it renders at a higher resolution and downscales — looks sharper but is much harder to run.
What I recommend: Leave it at 100% unless you are GPU-limited. Dropping to 85% gives a big performance boost with minimal visual difference.
Texture Quality
Textures are the images applied to every surface in the game — walls, floors, character skins, vehicles. Higher texture quality means more detail up close. At Low settings surfaces look flat and blurry up close. At Ultra they look sharp and detailed.
The key thing: texture quality mainly uses VRAM (video memory), not GPU processing power. If your GPU has 6GB or more of VRAM, you can run high textures without much fps impact. If you have 4GB or less, high textures can cause stuttering as the GPU runs out of memory.
What I recommend: Set as high as your VRAM allows. Check your GPU’s VRAM in Task Manager under Performance → GPU.
Shadow Quality
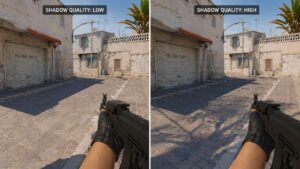
Shadows are one of the heaviest settings in almost every game. They have to be recalculated constantly as you and light sources move. The difference between Low and Ultra shadows can be 20–30fps on its own.
What does it look like? Low shadows are blocky and flickery. High shadows have soft edges and look natural. The catch: in fast multiplayer games, shadows can actually make it harder to see enemies — many pro players run Low shadows not just for performance but for visibility.
What I recommend: Medium in multiplayer games — you get decent performance and enemies are easier to spot. High or Ultra for single-player story games where it genuinely adds to the atmosphere.
Anti-Aliasing (AA)
Aliasing is the jagged, staircase effect on diagonal edges in games. Anti-aliasing smooths those edges out.
There are several types and they are all different in how they work and what they cost:
MSAA (Multisample AA) — high quality, very expensive. Blurs nothing, just fixes edges. Good for older games.
FXAA (Fast Approximate AA) — cheap, fast, but slightly blurs the whole image. You gain smoothness but lose some sharpness.
TAA (Temporal AA) — uses previous frames to smooth edges. High quality but can cause ghosting — a blurry trail behind fast-moving objects.
SMAA — a middle ground. Better quality than FXAA, cheaper than MSAA. Often the best all-round choice.
What I recommend: SMAA if available. If the game only has TAA and it bothers you, pair it with sharpening filters in the game or your GPU software.
DLSS, FSR and XeSS (AI Upscaling)
This changed everything when it arrived. Instead of rendering at your native resolution, these technologies render at a lower resolution and use AI or algorithms to reconstruct a sharp image that looks close to native.
DLSS (Nvidia) uses AI trained on thousands of game images. Quality mode looks almost identical to native resolution at much better performance. It is genuinely impressive.
FSR (AMD) works on any GPU — Nvidia and AMD — and uses a mathematical algorithm instead of AI. Quality mode looks good. Performance mode is noticeably softer but the fps gain is huge.
XeSS is Intel’s version, works on all GPUs, quality is between FSR and DLSS.
What I recommend: If you have an Nvidia RTX card, use DLSS Quality mode — it is the best upscaling available. If not, use FSR Quality mode. These settings can give you 40–60% more fps with minimal visual quality loss.
Field of View (FOV)
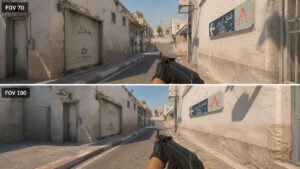
FOV controls how wide your field of vision is in first-person games. A low FOV (60–70) feels zoomed in and cinematic. A high FOV (90–110) lets you see more of the world around you but makes things look slightly distorted at the edges.
This is a personal preference setting but it also has a gameplay impact. Higher FOV means you can see threats from more angles. In a racing sim, wider FOV helps you judge corners better. In an FPS, it means fewer surprises from the sides.
The performance cost is minimal. It mostly affects motion sickness — lower FOV makes more people feel nauseous in first-person games.
What I recommend: Start at 90 and adjust to what feels comfortable. If you play on a large monitor close to your face, go higher.
Motion Blur
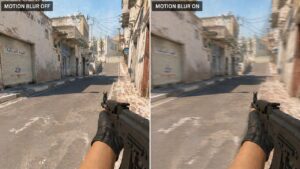
Motion blur mimics what a camera does when things move fast — it blurs fast-moving objects and the camera itself during quick turns. It is designed to make movement look cinematic.
Most gamers hate it.
In competitive games it makes it harder to track moving enemies. In racing sims some players like a small amount because it adds a sense of speed. But the default amount in most games is way too high.
What I recommend: Off in any multiplayer or competitive game. In single-player games try a small amount (20–30%) if the game feels too clean and clinical, but most people still prefer it off.
Depth of Field
Depth of field blurs objects that are far from the camera’s focus point, mimicking how a camera lens works. In cutscenes it looks beautiful — it makes games feel like films.
In gameplay it actively hides information. If something in the distance is blurred, you cannot see it clearly. Sniping becomes harder. Spotting enemies at range becomes harder.
What I recommend: Off during gameplay. In games where you cannot separate it from cutscenes, leave it on Low so cutscenes look good without ruining visibility.
Ambient Occlusion (AO)
Ambient occlusion adds subtle shadows where surfaces meet — under objects, in corners, between walls. Without it scenes look flat. With it they look grounded and three-dimensional.
SSAO (Screen Space Ambient Occlusion) is the basic version. HBAO+ is higher quality. RTAO (Ray Traced AO) is the best but expensive.
The visual difference is significant in single-player games. The performance cost is medium.
What I recommend: SSAO or HBAO+ in most games. Turn it off only if you are struggling for fps and have exhausted other options.
Ray Tracing
Ray tracing simulates how light actually behaves — how it reflects off surfaces, how shadows are cast from multiple light sources, how light scatters through water or glass. The results are stunning. Puddles actually reflect the environment. Shadows have soft edges that change with the light. Glass looks like real glass.
The cost is enormous. Ray tracing cuts fps dramatically, even on high-end GPUs. Most competitive players turn it off entirely.
What I recommend: Only turn on ray tracing if you have an Nvidia RTX 30 or 40 series GPU and you are pairing it with DLSS. Without that combination, the fps hit is not worth it in most games. In single-player games where you want the best possible visuals and you have the hardware — turn it on and enjoy it.
Draw Distance / Level of Detail (LOD)
Draw distance controls how far away objects are rendered at full detail before the game starts simplifying or removing them. Low draw distance makes distant trees, buildings and characters look blocky or pop in suddenly. High draw distance renders the full world as far as you can see.
In open world games this matters a lot. In small arena shooters it barely matters at all.
What I recommend: High in open world games. Medium or lower in small map multiplayer games where you will never see that far anyway.
Particle Effects
Particles are explosions, smoke, fire, sparks, weather effects. High particle settings make battles look spectacular — explosions with debris flying everywhere, thick volumetric smoke, detailed weather.
They also tank fps in heavy fights, right when you need frames the most. In the middle of a fight with 30 players and explosions everywhere, high particle settings can drop you 20–30fps exactly when it matters.
What I recommend: Medium in competitive multiplayer. High or Ultra in single-player or racing games where you want the spectacle.
Volumetric Fog and Lighting
Volumetric effects make light visible as it passes through the air — god rays through windows, fog that light bounces off, dust particles in sunbeams. It is one of the most beautiful settings in modern games.
It is also expensive and can genuinely hide enemies in multiplayer games. Fog that looks amazing in screenshots can completely conceal a player crouching 30 metres away.
What I recommend: Low or Off in multiplayer. High in single-player story games where visibility does not affect competitive outcomes.
HDR (High Dynamic Range)
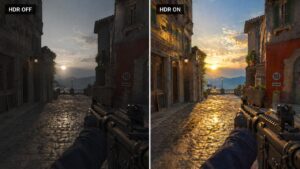
HDR makes bright areas brighter and dark areas darker simultaneously, producing a wider range of colour and light than standard displays. Sunlight looks genuinely blinding. Dark rooms are genuinely dark without losing detail in the shadows.
It only works if your monitor or TV supports HDR and you have it enabled in Windows. Bad HDR calibration actually looks worse than no HDR — washed out colours and muddy blacks.
What I recommend: If your monitor supports HDR properly (1000 nits brightness or higher), turn it on and spend 5 minutes calibrating it in the game’s HDR settings. If your monitor is 250–400 nits, you are probably better off leaving HDR off.
Refresh Rate
This is a monitor setting but it shows up in games too. Your refresh rate (60Hz, 144Hz, 165Hz, 240Hz) is how many times per second your monitor can update the image. You will never feel more than your refresh rate’s worth of smoothness no matter how many fps your GPU produces.
In the gaming café I watched people spend money on GPUs pushing 200fps on a 60Hz monitor. They felt none of those extra frames. Every rupee above what it takes to hit your refresh rate consistently is wasted on a 60Hz display.
What I recommend: Match your fps target to your monitor’s refresh rate. If you want 144fps gaming, you need a 144Hz monitor. Without that, the difference between 80fps and 144fps is invisible.
Brightness and Gamma
Brightness controls the overall lightness of the image. Gamma controls how the midtones are handled — slightly different from raw brightness.
Most games have a calibration screen where a logo should be barely visible. Follow it. Too bright and dark areas are washed out. Too dark and you genuinely cannot see into shadowed areas — a major competitive disadvantage in games with dynamic lighting.
What I recommend: Use the in-game calibration screen. On monitors without proper black levels (most IPS panels), go slightly brighter than the guide suggests.
Audio Settings (Quick Note)
People forget that audio settings are gameplay settings too. Footsteps, reload sounds, enemy callouts — these are information. In a shooter, hearing someone reload before you see them can save your life.
What I recommend: Headphones over speakers for any competitive game. Turn music down to 20–30% and keep sound effects and voice at 100%. Many games also have a “boost low” or “dynamic range” setting — this makes quiet sounds like footsteps louder without making explosions deafening. Turn it on.
The Settings I Actually Recommend for Most Gamers
After two years of watching every type of player — casual, competitive, sim racers, console players — here is what I tell people when they sit down and ask where to start:
For competitive multiplayer games (FPS, battle royale): prioritise frame rate above everything. Turn off motion blur, depth of field and volumetric effects. Set shadows to Medium. Use DLSS or FSR if available. Get your fps stable above your monitor’s refresh rate and leave it there.
For single-player story games: turn on ambient occlusion, high textures, high shadows, depth of field in cutscenes. If you have the GPU for it, turn on ray tracing. These games are meant to be experienced, not optimised for.
For racing simulators: FOV is critical — get it right for your screen size. Motion blur at 20–30% adds to the sense of speed. High draw distance matters because you need to see the corner ahead. Frame rate stability over maximum frames — a locked 60fps feels better than 90fps that dips to 50.
Final Thought
Before the gaming café I thought settings were just a slider from bad to good. Now I know they are a set of trade-offs — visual quality versus performance, immersion versus competitive advantage, personal comfort versus what looks best on a benchmark.
There is no single right answer. The right settings are the ones that make your specific game, on your specific hardware, on your specific monitor, feel the best to you.
But now at least you know what every option actually does. Start there, and tweak from that foundation.
Related Guides on FixMyGames.in
- How to fix low FPS during gameplay
- Can CPU thermal throttling cause game stuttering?
- How to optimise your computer for best performance
- Fix games that stutter due to a CPU bottleneck
- Monitor stuck at 60Hz instead of 144Hz — here’s how to fix it
- Second monitor lagging when playing games
- PC gaming for beginners
I spent 2 years managing a gaming café where I maintained a full setup — multiple gaming PCs, PS5 consoles, and racing simulators running back to back every day. I hold a Diploma in Computer Applications and started FixMyGames.in to document the real fixes I learned on the job — not the generic advice you find everywhere else.