
If you recently bought a Cybeart mouse, installing and properly configuring the Cybeart Mouse Software Node is essential to unlock its full features, like DPI customization, firmware updates, RGB control, debounce settings, and macro creation. In this guide, I’ll show you step by step how to install the software, updates firmware, and configure the mouse for the best performance.
This guide is based on real usage and includes an explanation of important settings like macros, debounce time, and dormancy time.
Step 1: Download the Cybeart Mouse Software
You can download the official Cybeart mouse software Node from the Cybeart website.
Steps:

- Go to the official website by searching for the mouse software Cybeart with your mouse model name.
- Look for your mouse model (example: Artemis or Xeus) in the search results.
- Click the download link for the mouse software Node
- The software file will download automatically
Once downloaded, save it to your PC.
Step 2: Install the Software
After downloading:
- Open the downloaded file
- Follow the installation instructions
- Click Next and Install
- Wait for the installation to complete
- Open the Cybeart mouse software
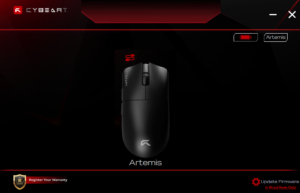
Make sure your mouse is connected via a wired connection during setup for best compatibility.
Once opened, the software will automatically detect your Cybeart mouse
Step 3: Update the Firmware (very important)
Before customizing settings, update the firmware to ensure the mouse works correctly.
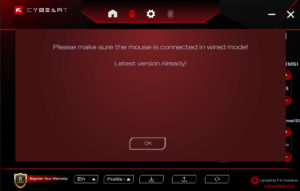
- Look at the bottom right corner in Cybeart Mouse software.
- Click update firmware.
- Keep the mouse connected via wired mode.
- Wait for the update to complete.
Firmware updates fix bugs and improve performance.
Step 4: Adjust DPI Settings
DPI controls how fast your mouse cursor moves.
Higher DPI = faster cursor
Lower DPI = slower cursor, more precision
To change DPI
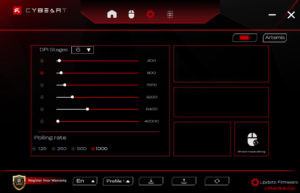
- Click on the mouse in main screen and settings menu will pop up.
- Select a DPI level.
- Adjust the DPI value according to your preference.
You can also save multiple profiles. Profile lets you store different DPI and mouse settings, so you can switch between them quickly without changing settings every time.
You can switch profiles anytime using the software or assign buttons to do your task. This makes it easier to use different settings for different tasks.
Step 5: Understanding and Creating Macros
Macros allow you to automate actions using a single mouse button.
For example, instead of pressing 4 key for planting the spike, you can assign this action to one mouse button.
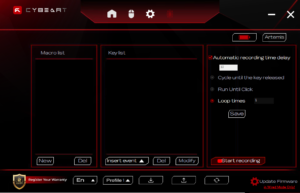
To create macro:
- Open macro section next to settings icon in software
- Click new macro and name it whatever you want
- Click start recording
- Press any keys you want to record, e.g.: if you want to assign key 4 to macros press the key 4.
- Click Stop Recording
- Click save.
- Now press on home icon and you will see all mouse buttons.
- Click on the mouse button you want to assign.
- Choose macros and your saved macros will appear.
- Now macros have been assigned to the mouse button of your choice.
Macros are useful for gaming shortcuts, productivity tasks and automating repetitive action.
Step 6: Understanding Debounce Time
Debounce time controls how quickly the mouse registers clicks.
Lower debounce time = faster click response
Higher debounce time = safer, prevents accidental double clicks
Recommended debounce settings:
Gaming: 4-8 Ms
General use: 8-12 Ms
If debounce is too low, it may cause double click issues.
You can also check my guide on how to fix mouse double clicking issue.
Step 7: Understanding Dormancy Time
Dormancy time controls when the mouse enters sleep mode to save battery.
If dormancy time is set to 60 seconds, the mouse sleeps after 60 seconds of inactivity
Recommended dormancy settings:
Gaming: 120-300 seconds
Battery saving: 30-60 seconds
Higher dormancy time prevents frequent sleep interruptions
Step 8: Save and Apply Settings
After making changes.
Click Save or Apply.
Settings will be saved directly to your mouse.
Your Cybeart mouse is now fully configured.
Best Settings for Cybeart Mouse (recommended)
DPI: 400-1600
Debounce: 6-8 Ms
Dormancy: 120-300 seconds
Polling rate: Highest available
These settings provide best responsiveness and stability.
Troubleshooting: Mouse Not Detected
If software does not detect mouse:
- Connect mouse using wired connection
- Restart software
- Update firmware
- Reconnect mouse
This fixes most issues.
FAQ section
Do I need Cybeart mouse software?
Yes, it unlocks advanced feature like DPI customization, macros, and firmware updates.
What is debounce time?
Debounce time controls how quickly the mouse registers clicks. Lower value improve response speed.
Is firmware update necessary?
Yes, firmware update fix bugs and improve performance.
Can I use Cybeart mouse without software?
Yes, but you cannot customize advanced settings.
You can also read my article on Cybeart gaming mouse review.
1 thought on “How to Install and Use Cybeart Mouse Software Node”