
Why Cleaning Your CPU Actually Matters
Most PC problems — slowdowns, crashes, overheating, loud fans — trace back to a dirty CPU cooler. A 15-minute clean can transform how your PC performs. Here’s why.
Your CPU (the main processor chip) generates a lot of heat when it works. A metal cooler with a fan sits directly on top of it to pull that heat away. Over time, two things happen that destroy cooling performance:
❌ Dirty CPU (What’s Happening Now)
Dust clogs the heatsink fins like a blanket, trapping heat. The thermal paste between the CPU and cooler has dried out and cracked. The fan is clogged and spinning slower. Result: CPU runs 20–40°C hotter than it should.
✅ Clean CPU (After This Guide)
Heatsink fins clear, fan spinning freely, fresh thermal paste conducting heat efficiently. Result: temperatures drop by 15–25°C, performance improves, fan noise drops significantly.
🌡️
Real numbers from our gaming café: After cleaning and reapplying thermal paste on a 3-year-old gaming PC, CPU temperatures under gaming load dropped from 91°C to 67°C. The game went from stuttering and crashing to running completely smoothly — without buying a single new part.
Related on FixMyGames.inWhy Is My CPU Overheating Suddenly? Causes and Fixes →
What You Need Before You Start
Everything here is cheap and available on Amazon.in or any electronics shop. You do not need special tools or experience.
💨
🧴
🪥
🧴
🔧
💡
📎
🧹
🚫
Never use a household vacuum cleaner. It generates static electricity that can instantly destroy your GPU or motherboard — no visible sparks needed. Compressed air only.
🚫
Never use regular rubbing alcohol under 90%. Lower concentrations contain too much water and can damage components. Look specifically for isopropyl alcohol (IPA) at 90% or higher. Available at medical stores or Amazon.in.
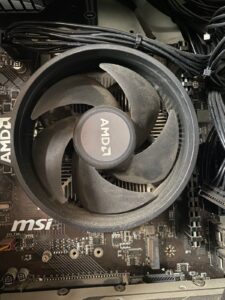
How to Clean a CPU Fan
The CPU fan is the most dust-magnet component in your entire PC. Even a thin layer of dust on the blades reduces airflow dramatically. Here’s how to clean it properly without damaging it.
Power Off and Unplug Completely
Shut down Windows properly, then flip the power switch on the back of your PC to off, then unplug the power cable from the wall. Don’t just press the power button — the motherboard stays partially powered even when the PC looks off. Wait 30 seconds before touching anything inside.
Open the Side Panel
Most modern PC cases have a side panel held by two thumbscrews at the back. Unscrew them and slide the panel off. If yours has regular screws, use a Phillips screwdriver. Place the panel somewhere safe.
Hold the Fan Blades Still With a Pencil
This is the most important step that most guides skip. If you spray compressed air and the fan spins freely at high speed, the bearing inside can get damaged permanently. Slide a pencil between the blades to stop them from spinning before you spray anything.
Spray Compressed Air in Short Bursts
Hold the can upright — tilting it causes liquid to spray out which can damage components. Use 2–3 second bursts only. Spray from above and from the sides. You’ll see dust clouds come out — that’s exactly what you want. Keep going until no more dust comes out.
Wipe the Fan Blades With a Cotton Swab
After blowing out loose dust, dip a cotton swab in isopropyl alcohol and gently wipe each fan blade. This removes the sticky grease and fine dust that compressed air can’t shift. Go around each blade once — you’ll be surprised how much comes off even after compressed air.
Let It Dry for 2 Minutes Before Powering On
Isopropyl alcohol evaporates very quickly, but give it 2 minutes to be completely safe. Do not power on while any surfaces look wet.
⚠️
If the fan makes a grinding or rattling noise after cleaning, the bearing may be worn out. A worn CPU fan needs replacing — a new one costs ₹800–2,500 depending on your cooler model. Running a PC with a dying fan is more dangerous than running it with no fan, because a grinding fan can stop suddenly without warning.
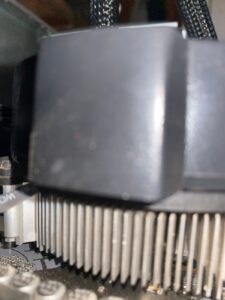
How to Clean the CPU Heatsink
The heatsink is the metal block with fins sitting on top of your CPU. It’s where dust does the most damage — because the fins are designed to maximise surface area, which also makes them perfect dust traps.
Shine a Flashlight Through the Fins
Before spraying anything, hold your phone flashlight on one side of the heatsink. Look at the other side — if you can’t see light coming through, the fins are completely blocked with dust. This tells you how much work is needed.
Spray Perpendicular to the Fins
This is the key technique. Spray compressed air through the fins sideways — from the intake side to the exhaust side, pushing the dust out the other end. Never spray into the fins from the front — you’ll just compact the dust further inside. Short 2–3 second bursts, multiple passes.
For Stubborn Dust — Use a Soft Brush
A clean, dry paintbrush or makeup brush works perfectly. Gently brush along the fin gaps to dislodge stubborn clumps, then follow with compressed air. Do not use any wet cloth on heatsink fins — moisture and metal fins is a rust risk.
Verify With the Flashlight Again
Shine the light through the fins again. You should now be able to see light coming through clearly from the other side. If there are still dark patches, do another pass. You’re looking for clear, unobstructed fin gaps all the way through.
How to Clean Thermal Paste Off a CPU
Removing old thermal paste is step one before applying fresh paste. Do this every 2–4 years on a desktop and every 1–3 years on a laptop. Dried paste is the second most common cause of CPU overheating after dust.
Step-by-Step: Removing Old Thermal Paste
Remove the CPU Cooler
Unscrew the cooler mounting screws in a cross-pattern (top-left → bottom-right → top-right → bottom-left). This ensures even release. Gently twist the cooler slightly as you lift to break the seal of the old paste — never yank it straight up or you might lift the CPU out of the socket with it.
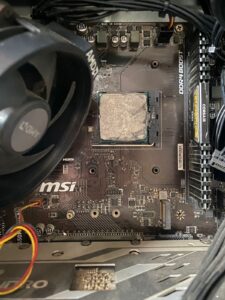
Look at the Old Paste
Note what it looks like. Fresh paste is smooth and grey. Old paste that needs replacing looks dry and chalky, has visible cracks, has pulled away from the edges, or has turned a different colour (whitish or brownish). Even if it just looks “a bit dry,” replace it — the cost is negligible vs the performance gain.
Wipe Off the Bulk With a Dry Cloth
Use a dry lint-free cloth or paper towel to gently wipe off the majority of the old paste from both the CPU chip and the bottom of the heatsink. Don’t rub hard — just wipe the bulk away. This makes the next step (alcohol cleaning) much faster.
Clean With Isopropyl Alcohol (90%+)
Dip a cotton swab or pad in isopropyl alcohol and clean the CPU surface in gentle circular motions. The alcohol dissolves thermal paste residue completely. Use a fresh swab as each one gets dirty. Keep going until the CPU surface looks mirror-clean with no grey residue left. Do the same on the heatsink base.
Let Both Surfaces Dry Completely
Isopropyl alcohol evaporates in 1–2 minutes at room temperature. Wait until both the CPU surface and heatsink base look completely clear with no sheen. Only apply new paste once both are fully dry — any moisture will reduce the paste’s effectiveness.
✅
How to know you’ve done it right: Hold the CPU up to light — the surface should look uniformly metallic with a slight shine. No grey smears, no white residue, no streaks. The heatsink base should look the same. If you can still see paste residue, do another alcohol pass.
How to Apply Fresh Thermal Paste
Applying thermal paste is easier than most people think — but there are a few wrong ways to do it. Here’s the right method, used across all the gaming PCs in our café.
The Pea Method — Use This
Squeeze a single pea-sized dot of thermal paste exactly in the centre of the CPU chip. That’s it. Don’t spread it, don’t add more, don’t try to cover the whole surface. When you press the cooler down, the pressure spreads it evenly and perfectly — better than any manual spreading technique.
How Much Is “Pea Sized”?
About 3–4mm in diameter — roughly the size of a small pea or a lentil. If you put too little, there will be gaps. Too much and it will overflow over the CPU edges, potentially getting into the CPU socket which is a problem. Pea size = perfect every time.
Lower the Cooler Straight Down
Hold the cooler directly above the CPU, aligned with the mounting holes. Lower it straight down without tilting or sliding it sideways — any lateral movement smears the paste unevenly. Make contact and immediately start tightening the mounting screws.
Tighten in a Cross-Pattern
Tighten the screws in a cross-pattern: top-left a little → bottom-right a little → top-right a little → bottom-left a little. Then repeat the full cycle until all screws are snug. Never tighten one screw all the way before touching the others — uneven pressure creates cold spots.
Verify the Spread (Optional)
If you want to check, remove the cooler carefully after the first test boot. The paste on the CPU should show a roughly circular or slightly square spread pattern covering most of the CPU die. If it looks very uneven or didn’t reach the edges, the paste amount or cooler pressure may need adjusting.
⚠️
Common mistakes to avoid: Don’t spread the paste with a card or your finger — this introduces air bubbles. Don’t use too much — overflow into the CPU socket can damage the motherboard. Don’t apply paste to both surfaces — only the CPU, never both sides.
Best Thermal Paste Brands in India
All of these are available on Amazon.in. You don’t need the most expensive one — for most users, Arctic MX-6 is all you need.
| Brand | Best For | Price (India) | Verdict |
|---|---|---|---|
| Arctic MX-6 | Most users — gaming PCs, office PCs, laptops | ₹600–800 | Best Value |
| Noctua NT-H1 | Beginners — very easy to apply, not runny | ₹700–900 | Easiest to Use |
| Thermal Grizzly Kryonaut | High-end CPUs, overclocked systems | ₹1,200–1,800 | Premium Pick |
| Cooler Master MasterGel | Budget option, widely available offline | ₹400–600 | Budget Pick |
| Stock paste (box cooler) | Brand-new CPU out of box only | Comes free | Replace after 2 years |
ℹ️
Avoid “liquid metal” paste like Thermal Grizzly Conductonaut unless you’re experienced. It’s electrically conductive — one drop in the wrong place can short your motherboard. Stick to standard grey paste for routine maintenance.
How to Clean a Laptop CPU
Laptops need cleaning more often than desktops — smaller vents clog faster, and the heat pipe design means one dust plug kills all cooling at once.
How Laptop Cooling Works
Most laptops have one fan connected to a flat copper pipe called a heat pipe. Heat from the CPU flows along this pipe to a small grid of fins at the exhaust vent on the side. Dust collects exactly where the fins meet the exhaust — like a filter. When that one spot is blocked, the entire cooling system fails simultaneously.
Try the External Method First (No Disassembly)
Before opening the laptop, try blowing compressed air directly into the exhaust vent on the side for 5–10 seconds. Cover the intake vents on the bottom with your hand first. This forces air through the heatsink fins in reverse and can dislodge significant dust plugs without opening anything.
For a Deep Clean — Remove the Bottom Panel
Search YouTube for “[your laptop model] disassembly” — there will almost always be a video. Remove the bottom panel screws (usually 8–12 Philips screws, sometimes different lengths — photograph which goes where). Pry the panel off gently with a plastic card or spudger. Do not use a metal screwdriver to pry — you’ll scratch or crack the panel.
Clean the Fan and Heat Pipe Exit
You’ll see the fan and the small block of fins where the heat pipe ends at the exhaust vent. This fin block is usually completely packed with grey dust. Hold the fan still with a pencil and blow compressed air through the fins until clear. Then wipe the fan blades with an alcohol swab.
Replace Thermal Paste Every 2 Years
Laptop thermal paste dries out faster than desktop paste due to higher sustained temperatures and thinner application. While the bottom panel is off, remove the cooler screws, clean the old paste with isopropyl alcohol, and apply a fresh pea-sized dot. This alone can drop laptop CPU temps by 15–20°C.
⚠️
Laptop still under warranty? Don’t open it — this voids the warranty. Contact the manufacturer’s support first. Most brands will clean your laptop for free under warranty if you report overheating.
Still overheating after cleaning?
Why Is My CPU Overheating Suddenly? All 9 Causes Diagnosed →
How Often Should You Clean Your CPU?
It depends on your environment — but here are the real-world schedules we use across our gaming café fleet.
🎮
Gaming PC
Every 3–4 months. Heavy use + high heat = faster dust buildup.
💼
Office / Home PC
Every 6 months. Lower load, but dust still builds up.
💻
Laptop
Every 3–6 months externally. Open for deep clean every 1 year.
🏠
Dusty Environment
Every 6–8 weeks. Pets, construction nearby, or no AC = rapid dust.
🧴
Thermal Paste
Replace every 2–4 years on desktop, every 1–3 years on laptop.
📊
Monthly Check
Use HWiNFO64 to check max CPU temp. Rising temps month-on-month = time to clean.
Your CPU Cleaning Checklist
Work through this in order. Whole process takes 20–30 minutes.
1 thought on “How to Clean a CPU: Fan, Heatsink & Thermal Paste (Step-by-Step)”