
Here is something that surprised me early on when I was running my gaming café. Our PCs had 16GB of RAM, and customers were still complaining about lag. Not after hours of gaming either. Sometimes within the first 30 minutes. If your PC freezes and it restarts randomly, there might be other issues causing the problem, including the RAM. Check my guide on PC freezing and random restarts to fix your problem.
I would open Task Manager and see RAM sitting at 78 to 85 percent before a game had even loaded properly. Windows itself, Discord, GeForce Experience, background update services — they were quietly eating gigabytes before the game got a fair chance.
Restarting always fixed it. But in a gaming café, asking a customer to restart mid-session is not an option. So I had to learn how to free up RAM without restarting, and these are the exact methods that actually worked for me.
This guide covers both Windows 11 and Windows 10. The steps are almost identical across both versions, and I will point out any differences where they exist.
First: Check How Much RAM Is Actually Being Used
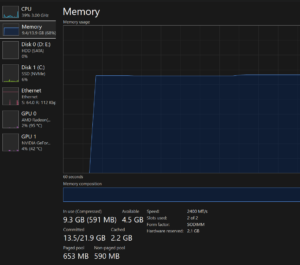
Before doing anything, you need to know where you actually stand. Press Ctrl + Shift + Esc to open Task Manager, click the Performance tab, and then select Memory. This gives you a clear picture of your total RAM, how much is in use, and how much is sitting in the standby cache.
If you are under 60 percent usage, RAM is probably not your problem, and you should check your CPU or storage instead. If you are between 60 and 80 percent, background processes are eating more than they should, and the fixes below will make a real difference. If you are above 80 percent before a game has even opened, Windows background services are completely out of control, or you genuinely need more physical RAM.
Also, switch over to the Processes tab and sort by the Memory column. This shows you exactly what is consuming RAM right now. On every cafe PC I checked, the top offenders were almost always the same handful of programs.
Fix 1: Kill Background Processes Right Now
This is the fastest and most effective thing you can do and it is exactly what I did on café PCs when a customer complained mid-session. You do not need any special tools for this, just Task Manager. Open it with Ctrl + Shift + Esc, go to the Processes tab, sort by Memory from highest to lowest, and right-click anything that looks suspicious and hit End Task.
The biggest RAM thieves I consistently found on gaming PCs were NVIDIA GeForce Experience, Discord, and browser tabs left running in the background. GeForce Experience alone can sit at 300 to 500MB doing absolutely nothing useful. Discord with hardware acceleration turned on quietly eats between 400 and 700MB. You can fix the Discord issue without closing it entirely by going into Discord Settings, clicking Advanced, and turning off Hardware Acceleration.
Windows Search indexing, which runs as SearchIndexer.exe in Task Manager, sometimes spikes RAM while it is actively indexing files. It is harmless in the long run but you can end the task temporarily to recover that memory right away.
One important warning here: do not end anything labelled System, lsass.exe, csrss.exe, or winlogon.exe. Those are core Windows processes and ending them will crash your PC immediately.
Fix 2: Disable Startup Programs That Load Into RAM Silently
This fix does not free up RAM in this exact moment but it makes sure your next session starts clean. When I set up new PCs for the cafe, most of them came loaded with 15 to 20 startup programs from pre-installed software. Nearly all of them were completely unnecessary for gaming.
Open Task Manager and find the Startup apps tab if you are on Windows 11 or the Startup tab on Windows 10. Sort by the Startup impact column and look for anything marked High that you do not need running the moment Windows boots. Right-click it and select Disable.
For most gaming PCs it is safe to disable Spotify, Steam, Epic Games Launcher, GeForce Experience, Teams, Skype, Zoom, and any manufacturer bloatware like HP Assistant or Lenovo Vantage. None of these need to be running the second Windows starts. You can open them when you actually need them.
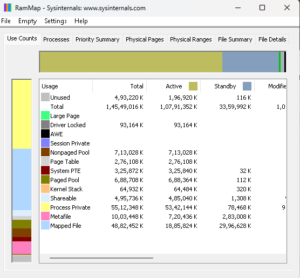
Fix 3: Flush the RAM Cache Using RAMMap
Windows holds onto memory it has already used in a standby cache in case you reopen those programs soon. This is actually a feature by design, not a bug. But after long gaming sessions this cache grows large and starts cutting into the memory your current game needs.
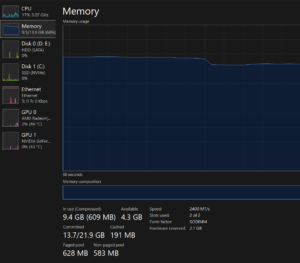
Download RAMMap from the official Microsoft Sysinternals website. It is completely free and made by Microsoft so there is no risk involved. Once you open it, click the Empty menu at the top and select Empty Standby List. This directly clears the standby cache and you will see your available RAM increase in Task Manager within seconds.
I have also created a web tool that lets you find any cmd or run command based on your problems, you can use it to find solution to your any problem or use it casually or for learning.
Fix 4: Turn Off Windows Visual Effects
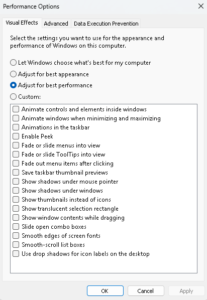
Windows 11 especially uses a noticeable amount of RAM just to run its animations, transparency effects, and rounded corners. On a gaming PC this is pure overhead with no benefit.
Press Windows + R, type sysdm.cpl, and hit Enter. Go to the Advanced tab, click Settings under the Performance section, and you will see a list of visual effects. You can either select Adjust for best performance to turn everything off at once, or go through manually and uncheck the animation and fade effects while keeping Smooth edges of screen fonts enabled so text still looks clean.
This was part of the standard setup I ran on every new PC in the cafe. It does not transform performance on its own but it removes a layer of unnecessary RAM and GPU overhead that adds up over a long session, especially on Windows 11 which is considerably more effects-heavy than Windows 10.
Fix 5: Set Your Virtual Memory to a Fixed Size
When physical RAM fills up, Windows uses a portion of your storage drive as overflow memory. This is called the pagefile or virtual memory. On a fast NVMe SSD it is manageable but on an HDD it causes severe lag because storage is dramatically slower than RAM.
The problem with letting Windows manage the pagefile size automatically is that it constantly expands and shrinks it during a session, which itself causes stutters. For a 16GB RAM gaming PC I always set it to a fixed size to prevent that.
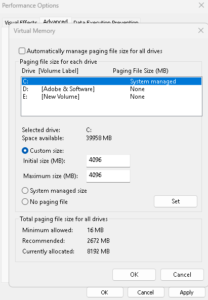
Go to Windows + R, type sysdm.cpl, and navigate to Advanced then Performance then Settings then the Advanced tab and finally Virtual Memory and click Change. Uncheck the option to automatically manage paging file size, select Custom size, and set both the Initial and Maximum values to 4096 MB for a 16GB system. Click Set and then OK. This change takes effect after your next restart.
Fix 6: Disable the SysMain Service
SysMain, which was called Superfetch in Windows 10, is a Windows service that preloads apps you use frequently into RAM so they open faster. In theory this sounds useful. In practice, on a gaming PC with 16GB of RAM running multiple games and background apps, SysMain often misreads your usage patterns and fills RAM with programs you do not need right now.
To disable it, press Windows + R, type services.msc, and hit Enter. Scroll down to SysMain, right-click it, go to Properties, and set the Startup type to Disabled. Then click Stop to kill it immediately without waiting for a restart, and click OK to save.
One important note here: if you are running Windows on an HDD rather than an SSD, leave SysMain enabled. The preloading it does actually helps compensate for the slower read speeds of a hard drive. This fix is specifically for SSD gaming PCs where preloading is not necessary.
What People Tell You to Do That Does Not Actually Work
After managing gaming PCs daily for over a year I can tell you which popular recommendations are a complete waste of time.
RAM cleaner apps like Mem Reduct look impressive because they show a big drop in RAM usage right after running. What they actually do is force-flush the standby cache that Windows manages deliberately. Clearing it means programs that were preloaded now have to reload from your storage drive instead, which is slower. You end up making performance worse, not better.
Upgrading to more RAM without fixing the root cause is another one. If Windows background services are consuming 8GB on a 16GB system, jumping to 32GB just delays the problem by a few months. The bloat grows to fill whatever space is available.
Changing RAM frequency in the BIOS is a separate issue entirely. It improves how fast data moves through your existing RAM but it does not free up a single megabyte of memory for your game. Frequency and available memory are completely different things.
Windows 11 vs Windows 10: Is There a Real Difference?
Yes, and it is noticeable. Windows 11 uses more RAM out of the box than Windows 10 for a few specific reasons. The visual effects layer is more aggressive, the Widgets service runs in the background by default, and on older builds of Windows 11 Microsoft Teams was built directly into the OS and loaded at startup automatically.
To disable Widgets on Windows 11, right-click the taskbar, go to Taskbar settings, and toggle Widgets off. That single change can free up 150 to 300MB on its own. If you are on an older Windows 11 build and Teams is loading at startup, disable it in the Startup tab of Task Manager immediately.
Every other fix in this guide applies equally to both Windows 10 and Windows 11. The menu paths are identical and only the visual style of the Settings app looks different between the two.
Where to Start Right Now
If your RAM is high right now and you need immediate relief without restarting, start with Fix 1 and Fix 3 together. Open Task Manager, sort by Memory, and kill GeForce Experience, Discord, and any browser tabs you are not actively using. Then run the RunDll32 cache flush command in an Admin Command Prompt. Check your RAM usage again after 60 seconds. Most people recover between 1.5 and 3GB from those two steps alone.
For a permanent solution that keeps RAM clean across every future session, Fix 2 and Fix 4 are the ones to prioritize. Disabling startup programs and turning off visual effects are one-time changes that compound over time and make a real difference to how the PC feels after several hours of use.
If you have done all of this and you are still running tight on memory, especially if you are on 8GB, that is a genuine hardware limitation. 16GB is the minimum for comfortable gaming in 2026 and if you are below that no amount of software tweaking will fully close the gap.
If freeing up your RAM did not solve your problem check my guide on PC crashing while gaming, this article will definitely help to solve your problem and is a must read.